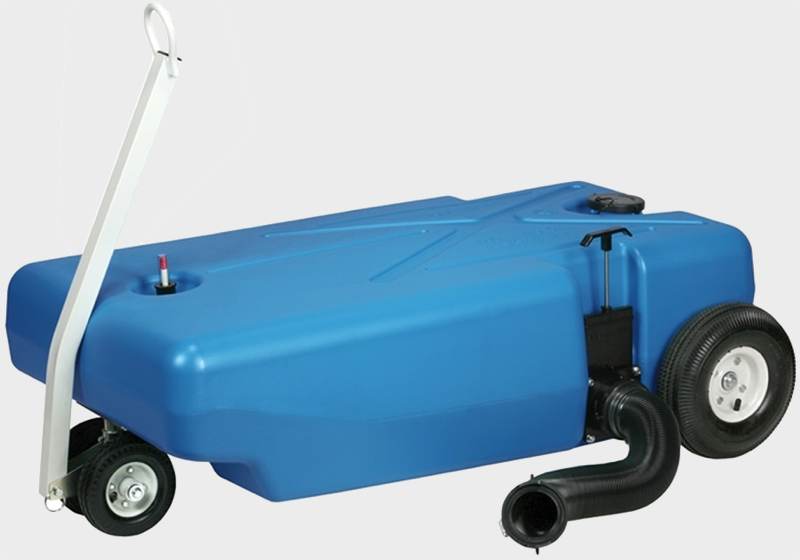
When you’re boondocking in remote locations or camping at sites without sewer hookups, a portable RV dump tank becomes one of your most valuable investments. These specialized waste transport systems allow you to empty your RV’s holding tanks without moving your entire rig to a dump station, giving you the freedom to stay put and enjoy your campsite longer. Whether you’re a weekend warrior or a full-time RVer exploring off-grid destinations, understanding how to select and use a portable waste tank properly can transform your camping experience from stressful to seamless.
Unlike traditional RV setups that require full hookups or frequent trips to dump stations, a portable tote tank serves as a mobile intermediary between your RV’s black and gray water tanks and the nearest disposal facility. These portable waste tanks are particularly beneficial for long-term camping destinations with partial hookups, where there isn’t a sewer connection at the campsite but a dump site exists somewhere at the campground or nearby. This mobility means you can extend your stay at prime camping spots without the hassle of breaking down camp every time your tanks reach capacity.
Understanding Portable RV Dump Tank Systems
A portable RV dump tank functions as a temporary holding container that collects wastewater from your RV’s onboard tanks and transports it safely to an approved dump station. Most tanks feature two round three-inch openings, with the top opening serving as the tank fill and the side opening designated for dumping, while others have only one three-inch opening used for filling, sealing during transport, and emptying. The engineering behind these systems focuses on creating a sanitary, leak-proof solution that handles the realities of waste management while remaining portable enough for one person to maneuver.
The core components of a quality portable waste tank system include the main tank body, typically constructed from UV-stabilized high-density polyethylene (HDPE), a wheel assembly for transport, filling and emptying ports with secure closures, integrated vents for proper air flow during filling and dumping operations, and a complete set of hoses and adapters for connecting to your RV and dump station. Premium models feature a low drain hole that ensures the tote tank empties completely and a smooth interior that’s easy to wash off using an integrated tank rinser. This attention to complete drainage prevents residue buildup and odor issues that plague cheaper alternatives.
How Portable Waste Tanks Work
The operation of a portable RV waste tank follows a straightforward process that anyone can master with minimal practice. You connect a 90-degree clear elbow to the fill opening on top of the tank, attach one end of your sewer hose to the clear elbow and the other to your RV’s holding tank outlet, then open the waste tank vent and empty your tanks into your tote the same way you’d empty them at a dump station. The clear elbow serves an important safety function by allowing you to visually monitor the flow and prevent overfilling.
The transparent adapter components aren’t just for convenience—they’re essential safety features that help you avoid messy disasters. When transferring waste from your RV to the portable tank, you’ll empty your black tank first, followed by the gray water tank. This sequence is crucial because the soapy gray water helps rinse and clean the hose after the black tank contents pass through. Remember that your portable waste tank usually has less room than your RV’s tank capacity, so you may need to empty one tank at a time and make several trips. Planning your dumping schedule around your portable tank’s capacity prevents overflow situations and keeps the process manageable.
Transport considerations require careful attention to both safety and legal requirements. Most portable tanks can be rolled by hand or attached to your truck hitch and towed at slow speeds with a recommended maximum of 5 MPH. Never tow any portable RV dump tank faster than walking speed as going fast may damage the wheels or the tank. For longer distances, secure your portable tank properly in an open truck bed to prevent movement during transit. The weight of a full tank—which can exceed 300 pounds depending on capacity—makes proper wheel design and towing capability critical features to evaluate before purchase.
Key Features That Define Quality Portable RV Dump Tanks
Tank Capacity Considerations
Selecting the appropriate capacity for your portable rv dump tank requires matching the tank size to your specific RV configuration and camping habits. Capacities range from 10 to 50+ gallons, with most quality models offering 20-40 gallon capacities to suit a range of RV sizes and trip durations. Smaller tanks in the 10-20 gallon range work well for popup campers, small travel trailers, or weekend camping trips where you’ll make frequent dumps anyway. These compact options offer easier maneuverability and lighter weight when full, making them manageable for solo travelers or those with limited physical strength.
Mid-size tanks between 21-35 gallons represent the sweet spot for most RV owners with standard travel trailers or small motorhomes. Models like the SmartTote2 with a 35-gallon maximum capacity include features such as retainer straps to hold the sewer hose in place and AutoStop level gauges to prevent the tank from overfilling while improving venting. These capacity ranges allow you to empty a typical 30-40 gallon black or gray water tank without overflow concerns, though you may still need to make two trips if emptying both tanks when they’re near full capacity.
Large capacity options exceeding 35 gallons serve full-time RVers or those with bigger rigs who want to minimize trips to the dump station. The Barker 4-Wheeler Tote Tank offers a 42-gallon capacity with a 4-wheel design featuring front-swivel design and pneumatic wheels with axle bearings for easier navigation while pulling or towing. However, remember that a larger capacity means significantly more weight when full—a 40-gallon tank holding waste can weigh over 350 pounds. This weight consideration makes robust wheel systems and proper towing mechanisms absolutely essential rather than optional features.
When calculating your ideal capacity, consider your RV’s total tank capacity, typical length of stay between dump runs, number of people using the facilities, and physical ability to handle the weight. A 30-gallon portable tank might seem perfect until you realize it weighs 280 pounds when full and your campground requires navigating uneven terrain to reach the dump station.
Wheel Design and Mobility Systems
The wheel assembly on your portable RV dump tank directly impacts how easy or frustrating the dumping process becomes, especially when dealing with several hundred pounds of waste. The wheels are one of the top issues people have with portable sewer tanks, as flimsy plastic wheels will sometimes crack or break off completely when put to the test under the weight of a full tank. Premium models address this vulnerability through thoughtful engineering and quality materials.
Top-tier tanks feature large, heavy-duty, no-flat wheels with bearings to make transport smooth and effortless, with some models including a removable steel tow adapter that allows you to easily roll the tote tank like a suitcase or tow it slowly behind a truck or golf cart. The “no-flat” designation refers to solid rubber or foam-filled tire designs that eliminate the risk of punctures and air pressure issues. These wheels typically measure 8-10 inches in diameter with width sufficient to distribute the load and prevent sinking into soft ground or gravel surfaces.
Two-wheel versus four-wheel configurations each offer distinct advantages depending on your camping environment and personal preferences. Two-wheel designs excel in tight spaces and allow for easier storage when not in use. They require you to tilt the tank back on its wheels for transport, similar to a hand truck operation. Four-wheel systems provide greater stability and allow you to push or pull the tank in an upright position, which some users find more comfortable and controlled. Four-wheel designs with front-swivel capability make it easier to navigate while pulling or towing the tank through campgrounds with tight turns.
One common problem people have with 4-wheel sewer tanks that have small front wheels is that the plastic part of the tank they are attached to can weaken and if it tears, you will suddenly have black or grey water leaking out. Quality manufacturers reinforce these attachment points with additional structural support and use thicker material in stress areas. Look for tanks with metal axles, sealed bearings, and replaceable wheels—these features indicate a manufacturer’s commitment to long-term durability rather than just initial sale appeal.
The handle design deserves equal attention to the wheels themselves. Ergonomic handles with comfortable grips reduce hand strain during extended pulling or pushing. Telescoping handles offer adjustability for users of different heights and fold away for more compact storage. Some premium models include both a conventional handle for manual rolling and a hitch adapter for vehicle towing, providing flexibility based on distance and terrain challenges.
Ventilation and Drainage Systems
Proper ventilation makes the difference between a portable tank that empties in minutes versus one that takes frustratingly long periods due to air pressure issues. Most manufacturers of RV dump tanks know you need to have a vent or air hole at the top to stop the vacuum effect, but there are a few out there that don’t have this feature, and if you don’t have a decent vent on your RV portable waste tank, it is going to take a long time to fully dump it.
The physics here are straightforward—as waste flows out through the bottom opening, air must enter through the top vent to replace the volume, or a vacuum forms that slows or stops drainage entirely.
Quality vent designs incorporate several key features beyond just providing an opening. They should include secure closures that seal completely during transport to prevent spillage and odor escape, easy-to-operate mechanisms that can be opened and closed with one hand while wearing gloves, and sufficient diameter to allow adequate airflow without restricting it. Advanced models like the Camco Rhino include an inner tank sprayer through the vent connection, functioning like a black tank flush system found on high-end RVs and trailers. This rinse capability helps maintain cleanliness and reduces odor buildup over time.
The drainage system configuration affects both how completely the tank empties and how convenient the dumping process becomes. Standard configurations place the drain valve at the lowest point of the tank, utilizing gravity for complete drainage. The Camco Rhino features both a standard sewer connection on the bottom of the tank for filling and emptying by standing it up, plus a gated sewer connection on the side so you can empty it without having to stand it up. This dual-port design provides operational flexibility—the bottom port works well for connections where you can elevate the tank, while the side port allows dumping when ground clearance is limited.
The size of the drain valve directly impacts emptying speed. Look for valves with 3-inch or larger openings that match standard RV sewer connections. Smaller valves restrict flow and extend dumping time significantly. The valve mechanism itself should operate smoothly with a clear open/closed indication, feature durable seals that don’t leak or degrade from chemical exposure, and include a secure locking mechanism to prevent accidental opening during transport. Gate valve designs generally provide better flow than ball valves for waste applications.
Construction Materials and Durability
The material composition of your portable RV dump tank determines how well it withstands the harsh realities of waste management, outdoor exposure, and repeated use. Professional-grade tanks are constructed from durable, UV-stabilized blow-molded HDPE that withstands outdoor use without leaks or sun damage. The blow-molding process creates a seamless, single-piece container without seams or joints that could develop leaks—a critical advantage over tanks assembled from multiple components.
UV stabilization prevents the plastic from becoming brittle and cracking after extended sun exposure. Without this protection, plastic tanks can develop stress fractures within a single season of use, particularly in high-sun environments like desert boondocking locations. The polyethylene must be sufficiently thick to handle the stress of containing several hundred pounds of liquid weight while maintaining flexibility to absorb impacts from rough terrain transport. Quality manufacturers use material thickness of 1/4 inch or greater in high-stress areas.
Hardware components—including valves, fittings, handles, and tow adapters—should be constructed from corrosion-resistant materials. Stainless steel and heavy-duty galvanized steel provide the best longevity for structural components like tow bars and wheel axles. Brass fittings offer superior durability and chemical resistance compared to plastic alternatives. The patented Rhino design ensures exceptional craftsmanship and quality with premium materials, and these tanks are proudly manufactured in the USA. Domestic manufacturing often indicates stricter quality control standards and easier access to replacement parts when needed.
The interior surface finish impacts both ease of cleaning and long-term sanitation. Smooth, non-porous interiors resist waste adhesion and allow for thorough rinsing. Textured or rough interiors can trap residue in microscopic pits and crevices, creating persistent odor problems and bacterial growth areas that are difficult to sanitize. Regular maintenance becomes much easier with tanks designed for cleanability from the beginning.
Complete Accessory Packages vs. Basic Tank-Only Options
What Should Come Included
When shopping for a portable rv dump tank, you’ll encounter models ranging from bare-bones tank-only offerings to comprehensive ready-to-use kits with all necessary components. Understanding what accessories you actually need helps you evaluate the true cost and value of different options. Premium packages include a durable handle, oversized wheels, tank rinser, ladder hook, super heavy-duty sewer hose with swivel bayonet and lug fittings, female-to-female grey water hose, and clear elbow with 4-in-1 adapter. These complete kits allow you to start using your portable tank immediately without hunting for compatible components or making additional purchases.
The sewer hose quality and fittings deserve particular attention since they’re your direct interface between RV, portable tank, and dump station. Quality kits include a 3-foot super heavy-duty sewer hose with swivel bayonet and lug fittings specifically designed for the filling and emptying process. The swivel feature prevents hose kinking and binding, while the bayonet and lug fittings provide secure, leak-free connections that won’t separate under pressure. Standard 15-foot RV sewer hoses work for the RV-to-portable-tank connection, but the shorter heavy-duty hose for tank-to-dump-station provides better control and easier handling.
Storage accessories make a significant difference in the overall user experience. Ladder hooks allow you to secure the empty tank to your RV’s rear ladder during travel, keeping it accessible while freeing up valuable cargo space. When not in use, an integrated ladder hook can clamp onto RV or camper ladders, with the body of the tote tank featuring grooves to strap it in place. Hose storage solutions keep your sewer hoses contained and prevent them from touching other gear. Some tanks include dedicated storage compartments for small accessories like caps, adapters, and gloves.
The clear elbow adapter serves as a critical safety component that many new users overlook. This transparent fitting connects between your RV’s outlet and the sewer hose, allowing you to visually monitor the waste flow and detect when the portable tank approaches capacity. The clear view prevents overfill situations that would otherwise result in unpleasant cleanup. The clear elbow connects to the fill opening on top of the tank with one end of your sewer hose attached to it and the other to your RV’s holding tank outlet. The 4-in-1 adapter ensures compatibility with various dump station configurations.
Essential Add-On Accessories
Beyond the basic components, several accessories enhance safety, convenience, and sanitation when working with your portable RV dump tank. Disposable nitrile gloves specifically designed for RV waste management provide an essential protective barrier. Heavy-duty versions with extended cuffs protect forearms during hose connections and disconnections. Keep multiple pairs on hand since gloves can tear during use, and you’ll want fresh gloves for each dumping session.
Tank treatment chemicals designed for portable waste tanks help control odors, break down solid waste, and maintain a more sanitary environment inside the tank. These formulations differ from those used in RV holding tanks since portable tanks don’t have the same extended dwell time. Enzyme-based treatments work effectively without damaging tank materials or seals. Apply treatment after each use rather than before filling to ensure it’s present during storage periods when odors develop.
A dedicated water hose for tank rinsing must remain separate from your drinking water hose to prevent contamination. Color-coded hoses (typically white for fresh water, non-white for waste) help prevent dangerous mix-ups. Premium tanks include a 15-inch female-to-female grey water hose and integrated tank rinser for cleaning operations. The short length proves ideal for connecting to dump station water supplies without excessive hose to manage during the rinsing process.
Wheel chocks or stabilizers prevent the portable tank from rolling during filling and emptying operations, particularly on sloped ground. Compact models designed for RV use work perfectly for securing portable tanks. A small adjustable wrench or pliers helps tighten connections that work loose with use. Keep these tools in your RV’s external storage compartment along with spare hose clamps, replacement caps, and lubricant for valve mechanisms.
For those making frequent dumps or dealing with particularly challenging terrain, a small dolly or hand truck provides an alternative transport method if the tank’s wheels become damaged or prove inadequate for your specific campground conditions. This backup approach ensures you’re never stranded with a full tank and no way to move it to the dump station.
Comparing Popular Portable RV Dump Tank Models
Premium Options: Camco Rhino Series
The Camco Rhino 21-Gallon model serves as the best overall pick among portable waste tanks, priced at approximately $162.48. This mid-capacity option strikes an excellent balance between tank volume and manageable weight when full. The Rhino features UV-stabilized HDPE construction that provides durability while packing a lot of functionality into its relatively compact 21-gallon size, with heavy-duty no-flat wheels with bearings for smooth transport. The construction quality justifies the premium price point for RVers who camp frequently and need reliable equipment that lasts multiple seasons.
The 36-gallon Rhino model weighs around 40 pounds empty and approximately 340 pounds when completely full, measuring 46 inches long, 25 inches wide, and 15.5 inches tall. This larger capacity suits full-time RVers or those with bigger rigs, though the weight when full requires careful consideration of your physical capabilities and transport method. The included accessories comprise a 15-inch water hose rinse adapter, clear elbow with 4-in-1 adapter, clear double bayonet elbow, sewer hose caps, and heavy-duty 3-foot Rhino sewer hose with bayonet and lug fittings. Everything you need arrives in one box—no supplemental purchases required to start using the system.
The Rhino’s standout feature remains its dual-port emptying capability that provides operational flexibility other tanks lack. The standard sewer connection on the bottom allows filling and emptying by standing the tank up, while the gated sewer connection on the side enables emptying without standing it up—this second sewer hose connection feature is only found on one other RV portable waste tank. This design advantage proves particularly valuable when working with dump stations that have limited vertical clearance or when you want to avoid the physical strain of tipping a heavy tank.
Perhaps the fanciest feature is the spray rinse connection, where Camco has included an inner tank sprayer through the vent that functions like a black tank flush system found on high-end RVs and trailers—a unique feature only found on the Camco Rhino that pushes it ahead of other RV waste tanks. This internal rinse system allows thorough cleaning without opening the tank, maintaining sanitation while extending the time between deep cleaning sessions. The only potential drawback is the tank’s height, which can be problematic if your RV’s sewer outlet sits very low to the ground, though gravity should still allow proper drainage in most configurations.
Mid-Range Solutions: Thetford SmartTote Series
Thetford’s SmartTote line offers several capacity options with consistent quality features across the range. The 35-gallon SmartTote2 comes as a portable waste tank ready to use right out of the box with pre-attached RV sewer hose, 4 heavy-duty wheels, and tow handle for increased maneuverability. The pre-attached hose eliminates the fumbling with connections that occurs with separate hose systems, though it does limit flexibility if you need to replace a damaged hose with a different brand or length.
Thetford tanks feature the lowest fill height in the industry and integrated vent for accelerated tank emptying. The lower fill height provides advantages when working with RVs that have sewer outlets positioned close to the ground—a common configuration on vintage trailers and some popup campers. The generous vent sizing ensures rapid airflow during emptying, reducing dump times and minimizing the period you spend at the dump station handling waste operations.
The SmartTote series includes several user-friendly features that enhance the ownership experience. Models incorporate retainer straps to hold the sewer hose in place and AutoStop level gauges to prevent the tank from overfilling while improving venting. The AutoStop gauge provides visual indication of tank fill level, helping you stop transfer before reaching maximum capacity and risking overflow. This feature proves especially valuable for new RV owners still learning to estimate tank volumes during transfer operations.
Thetford offers conversion kits for their Titan 2-wheel totes that are easy to install with no modifications needed, converting the 2-wheel tote into a 4-wheel tote for improved maneuverability. This upgrade path allows you to start with a lower-cost 2-wheel model and upgrade later if you find you need the enhanced stability and ease of movement that 4-wheel designs provide. The 21-gallon, 27-gallon, and 35-gallon capacities cover the full range of RV sizes from compact trailers to large motorhomes.
Budget-Friendly Alternatives
For those working with a limited budget but still needing a camper waste tank, the Tote-N-Stor 25609 represents the best portable RV waste tank for a bargain price tag with a 32-gallon capacity that allows you to conveniently empty a 30-gallon black or gray water tank without worrying about spills or overflow. The generous capacity-to-price ratio makes this model attractive for occasional campers or those new to RV ownership who want to try a portable waste tank system without major financial commitment.
Budget models do require accepting certain compromises compared to premium options. The Tote-N-Stor’s plastic-rubber wheels are weak and potentially prone to breaking off, especially when moving over rough terrain to get to the dump station—you might want to strap the waste tank to a hand truck if you already own one. The small breather port adds a minute or two to the final dump-out process compared to models with larger vents. These limitations prove manageable for many users, particularly those camping at well-maintained RV parks with smooth paths to dump stations.
Smaller capacity options like 6-gallon and 12-gallon tanks serve niche applications. The 6-gallon capacity portable black water tank provides exceptional portability and excellent sanitary performance with rugged never-flat wheels that help roll to the nearest draining station without unneeded strain. These compact sizes work well for popup campers, van conversions, or as supplemental tanks for gray water when you want to extend time between dumps of your main black tank. The lower cost and easier handling when full make them practical for solo travelers or those with limited physical capabilities.
The Hike Crew 19.8-gallon portable RV wastewater tank features a spacious holding capacity with durable design that combines exceptional portability and sanitary performance, with heavy-duty plastic reservoir that’s lightweight yet resilient. It includes a built-in air release valve to remove excess pressure and a water level indicator to monitor current tank capacity and minimize risk of overfill. Mid-range pricing with quality features makes models like this attractive to RVers seeking the sweet spot between cost and capability.
Step-by-Step: How to Use Your Portable RV Dump Tank
Filling Your Portable Tank from Your RV
Proper setup and filling procedures ensure safe, sanitary transfer of waste from your RV to the portable tank. Start by positioning your portable tank near your RV’s sewer outlet, keeping it on level ground if possible. Connect a 90-degree clear elbow to the fill opening on top of the tank, attach one end of your sewer hose to the clear elbow and the other to your RV’s holding tank outlet. Ensure all connections are secure and properly seated—loose connections will separate under pressure during transfer, creating a situation nobody wants to deal with.
Before opening any valves, perform a quick visual inspection of all connections. Put on your protective gloves at this stage rather than scrambling to get them on after a problem develops. Have cleanup supplies readily accessible including paper towels, sanitizing wipes, and a bucket of soapy water for dealing with any drips or spills. Being prepared before starting the transfer process reduces stress and helps you respond quickly to any issues.
Open the waste tank vent and empty your tanks into your tote the same way you’d empty them at a dump station—black tank first, then the gray water tank. The black-then-gray sequence matters because the soapy gray water rinses the hose after the black tank empties, reducing odor and keeping your equipment cleaner. Watch the clear elbow during transfer to monitor flow and ensure you don’t overfill the portable tank. Stop transfer when you see waste approaching the elbow connection rather than waiting until it reaches the absolute top.
Close your holding tank valves and screw the waste tank vent shut before detaching the sewer hose from your RV’s tank outlet, then cap your RV’s outlet before proceeding. This sequence prevents any dripping or spillage. Connect the detached end of your sewer hose to the dump opening on the side and leave the clear elbow and the other end of the hose connected to the fill opening, or detach the sewer hose completely and cap both openings on your RV and the portable tank. The method you choose depends on whether you’ll be dumping immediately or transporting the closed tank for dumping later.
Transporting Safely to the Dump Station
Safe transport requires attention to both the physical securing of the tank and adherence to appropriate speed and handling protocols. Most tanks can be rolled by hand or attached to your truck hitch and towed at slow speeds with a recommended maximum of 5 MPH. Hand rolling works well for dump stations located within your campground or a short distance away on paved or well-maintained gravel surfaces. The no-flat wheels on quality tanks handle these distances without difficulty.
For longer transport distances or rough terrain, secure your portable tank in an open truck bed so it doesn’t move around while in transit. Use ratchet straps or bungee cords to anchor the tank to the bed’s tie-down points, positioning it to prevent tipping or sliding. Place cardboard or old towels under the tank to protect your truck bed and provide cushioning against road vibrations. Never transport a portable waste tank inside an enclosed vehicle or passenger area—even with secure caps, odor penetration and potential contamination risks make this practice unsafe.
If towing behind a vehicle, use the manufacturer-provided hitch adapter and follow their specific guidance on attachment points and towing speed. Never tow any portable RV dump tank faster than walking speed as going fast may damage the wheels or the tank. The relatively fragile wheel assemblies and plastic tank body cannot withstand the stresses of higher-speed towing or sudden stops. Plan your route to the dump station to avoid steep hills, sharp turns, and rough surfaces when possible.
Check local regulations regarding waste transport before traveling public roads with your portable tank. Some jurisdictions require specific securing methods or restrict transport of waste containers on certain road types. Most campgrounds and RV parks permit on-property transport of portable waste tanks to their dump stations without restriction, but verify their specific policies if you’re unsure. Some facilities designate particular hours for dump station use or restrict certain types of tanks.
Emptying at the Dump Station
Efficient dump station operations minimize your exposure time and reduce the chance of contamination. Start by positioning your portable waste tank near the sewer drain connection at the dump station. Orientation matters—you want the drain valve directly over or very close to the dump station inlet to minimize hose length and reduce spillage risk. Check that the dump station’s grate or inlet is clear of debris before beginning your emptying process.
Detach the sewer hose and 90-degree connector from the tank’s fill opening and cap the fill opening to prevent odor escape and contamination during the dumping process. Attach the 4-in-1 adapter to the 90-degree connector and screw or place the connector into the dump inlet. The secure connection to the dump station inlet contains odors and prevents splashing during the dumping operation. Some dump stations have threaded connections while others use slip-fit designs—the 4-in-1 adapter accommodates both types.
Open the waste tank vent and pull the handle on the dump opening to empty its contents, tilting your tank as needed to empty it as the level drops. The vent opening allows air to enter as waste exits, ensuring smooth, rapid flow. Watch the tank as it empties and adjust the tilt angle to direct remaining waste toward the outlet. Shake or rock the tank gently to dislodge waste clinging to interior surfaces. Continue tilting until no more flow occurs—proper drainage now prevents residue accumulation and odor development during storage.
After emptying, the cleaning process begins. Remove the fill opening cap and attach one end of your sewer hose for rinsing operations. If your tank includes an integrated rinse system, connect a clean water hose to the rinse port and run water through the internal sprayer for several minutes while agitating the tank to dislodge any remaining waste. For tanks without internal rinsers, pour several gallons of clean water through the top opening, swish it around vigorously, and drain completely. Repeat this rinse-and-drain cycle until the water runs clear.
Add an appropriate tank treatment chemical before final storage to control odors and maintain sanitary conditions. Secure all caps and covers, ensuring they’re completely sealed. Rinse the exterior of the tank with clean water, paying special attention to wheels, handles, and any areas that contacted waste. Sanitize your gloves before removing them or dispose of them properly. Wash your hands thoroughly with soap and water even after removing gloves—double protection ensures safety.
Maintenance and Long-Term Care for Your Portable Tank
Regular Cleaning Protocols
Consistent cleaning after each use extends your portable RV dump tank’s lifespan and prevents the buildup of stubborn residue and persistent odors. Beyond the basic rinse at the dump station, periodic deep cleaning maintains sanitary conditions and equipment functionality. After the standard dump station rinse, fill the tank one-third full with clean water, add a generous amount of specialized tank cleaner or a mixture of dish soap and white vinegar, seal all openings, and transport the tank back to your campsite. The movement during transport agitates the cleaning solution, helping it reach all interior surfaces.
Once back at your site, let the cleaning solution sit in the tank for 30-60 minutes to break down residue and eliminate odor-causing bacteria. Empty the cleaning solution at your next dump station visit or into a proper waste disposal location. Follow with multiple fresh water rinses until the water runs completely clear and odor-free.
Seasonal deep cleaning involves more intensive procedures. Remove all hoses, caps, and detachable components for individual cleaning. Soak rubber seals and gaskets in warm soapy water to remove accumulated grime without damaging the material. Inspect valves for debris or waste buildup that could compromise their seal. Use a long-handled brush specifically designated for tank cleaning to scrub interior surfaces, paying particular attention to corners and the area around drain openings where residue tends to accumulate.
The exterior cleaning process matters as much as interior maintenance. Wash the tank body, wheels, and handle assembly with automotive soap or all-purpose cleaner to remove road dirt, dust, and any waste residue from spills. Rinse thoroughly and allow to air dry completely before storage. Apply a UV protectant spray to the plastic surfaces once or twice per season to maintain the material’s flexibility and resistance to sun damage. These protectants create a barrier against UV degradation that extends the tank’s useful life by several years.
Hose and fitting maintenance requires dedicated attention since these components contact waste directly and suffer from frequent connection and disconnection cycles. After each use, rinse hoses thoroughly inside and out with clean water. Hang them to drain and dry completely before storage—moisture trapped in hoses creates ideal conditions for bacterial growth and persistent odors. Inspect hose ends for cracks or deformation that could cause leaks. Check that bayonet and lug fittings still grip securely and replace any that show excessive wear.
Addressing Common Issues
Even quality portable waste tanks develop issues over time, but most problems have straightforward solutions that don’t require professional repair or replacement. Persistent odors represent the most common complaint among portable tank owners. If odors persist despite regular cleaning, the issue typically stems from waste residue trapped in hard-to-reach areas or bacterial biofilm development on interior surfaces. Address this by filling the tank with a solution of one part bleach to ten parts water, let it sit for several hours or overnight, then rinse thoroughly multiple times until no bleach smell remains.
Valve leaks usually result from worn seals or debris preventing complete closure. Disassemble the valve mechanism according to manufacturer instructions and inspect all components. Replace rubber seals and gaskets showing signs of cracking, hardening, or deformation. Clean the valve body and gate or ball thoroughly to remove any waste particles preventing proper seating. Apply food-grade silicone lubricant to moving parts to ensure smooth operation. If the valve body itself shows cracks or damage, contact the manufacturer about replacement parts—most premium brands offer individual component replacement rather than requiring full tank purchase.
Wheel problems range from minor squeaking to complete failure. Squeaky wheels usually need lubrication on the axle points. Apply a waterproof bearing grease rather than spray lubricants that wash away quickly. If wheels wobble or feel loose, check that axle bolts or pins are properly secured and tighten as needed. Cracked or broken wheels require immediate replacement before the next use—continuing to use a tank with damaged wheels risks complete failure while the tank is full, creating a difficult cleanup situation. Keep the manufacturer’s part numbers for wheels and axles readily available for quick ordering.
Vent blockages cause slow drainage and create vacuum issues during filling. Remove the vent cap and inspect the opening for debris, insect nests, or crystallized waste deposits. Clean thoroughly with a small brush and flush with water. Some tanks include replaceable vent screens to prevent insect entry—check these screens regularly and clean or replace them when blocked. If your tank lacks insect protection on the vent, consider adding a small piece of stainless steel mesh secured with a hose clamp during storage periods.
Cap and cover problems typically involve stripped threads or lost components. Cross-threading damages both male and female thread surfaces, so always align threads carefully before tightening and never force connections. Replace caps showing thread damage immediately—a poor seal leads to odor escape and potential spillage during transport. Keep spare caps in your RV’s storage compartment as insurance against loss. Attach a short cable or chain to caps using drilled holes and rivets to keep them connected to the tank and prevent misplacement.
Winter Storage and Seasonal Preparation
Proper off-season storage protects your portable rv dump tank from freeze damage and extends its operational lifespan significantly. Before storage, complete a thorough cleaning as described above and ensure the tank is completely empty and dry. Any water remaining in the tank, valves, or hoses can freeze and cause cracks in the plastic or damage to seals. Tilt the tank at various angles to drain water from low points and use compressed air if available to blow out residual moisture from hoses and fittings.
Add a small amount of RV antifreeze to valves and moving parts to prevent freeze damage and keep seals pliable during cold weather. Pour approximately one cup of RV antifreeze into the tank and swish it around to coat interior surfaces, then drain it out. This leaves a protective film that prevents any residual moisture from freezing. Never use automotive antifreeze, which is toxic and can contaminate your system.
Store the tank in a protected location away from direct sunlight and temperature extremes. An enclosed garage or storage shed provides ideal conditions. If outdoor storage is necessary, cover the tank with a UV-resistant tarp or dedicated tank cover, elevate it off the ground using blocks or pallets to prevent moisture accumulation underneath, and position it where snow and ice won’t accumulate on top. Remove wheels if storing long-term to prevent flat spots from developing where the weight rests on the tires.
Before spring use, conduct a complete inspection of all components. Check for cracks in the tank body, particularly around stress points like wheel attachments and handle mounts. Test all valves for smooth operation and proper sealing. Inflate or replace wheels as needed. Run clean water through the entire system to verify no leaks developed during storage and to flush out any antifreeze residue. This pre-season checkout prevents discovering problems when you’re already at a campsite and need the tank immediately.
Making the Purchase: What to Consider Before Buying
Matching Tank Size to Your RV and Camping Style
Selecting the appropriate portable RV dump tank capacity requires honest assessment of your specific situation rather than simply choosing the largest or cheapest option. Start by identifying your RV’s black and gray water tank capacities—these specifications appear in your owner’s manual or on placards inside your RV. A portable tank should hold at least the volume of your smallest holding tank to allow complete emptying in a single transfer, though matching your largest tank capacity provides the most operational flexibility.
Your typical camping duration between dump runs directly impacts ideal tank size. Weekend campers who visit campgrounds with dump stations every few days can manage with smaller 15-20 gallon portable tanks since they’ll empty frequently regardless. Extended stay campers and boondockers who remain in one location for weeks benefit from larger 35-42 gallon capacities that reduce dump frequency and extend time between leaving the campsite. Full-time RVers might consider owning two tanks for rotation—one in use while the other is cleaned and ready, preventing the buildup of residue and odor that occurs with continuous use.
The number of occupants in your RV affects waste generation rates significantly. Solo travelers produce less waste volume than families, allowing smaller tank options. Consider your water usage patterns as well—frequent showers, dish washing, and laundry generate substantial gray water volume that fills tanks quickly. If your gray tank fills much faster than your black tank (common for most RVers), you might prioritize matching your gray tank capacity or plan to make multiple trips per dump cycle.
Physical considerations extend beyond just the tank’s weight when full. Evaluate your physical capability to move several hundred pounds across potentially uneven terrain. Consider the distance from your typical camping spots to dump stations and the terrain conditions you’ll encounter. If you have mobility issues or camp in locations with challenging access to dump facilities, prioritize tanks with superior wheel systems and towing capability or choose smaller capacities that are easier to maneuver when full.
Brand Reputation and Warranty Coverage
Investing in an established brand with proven reliability provides peace of mind and long-term value that justifies higher initial costs. Camco and Thetford lead the portable waste tank market with decades of manufacturing experience and consistent innovation in design and materials. These manufacturers maintain extensive dealer networks and readily available replacement parts, ensuring you can find help when needed rather than struggling to source obscure components for generic tanks.
Warranty coverage varies significantly between manufacturers and should factor heavily into purchase decisions. Premium brands typically offer 1-3 year warranties covering manufacturing defects and material failures. Read warranty terms carefully to understand what’s covered and what’s excluded. Many warranties don’t cover damage from improper use, overfilling, or exposure to chemicals not recommended by the manufacturer. Keep your purchase receipt and register your product with the manufacturer when this option is available—registration often extends warranty coverage or provides access to customer support resources.
Customer reviews and ratings provide real-world insights beyond marketing claims. Look for patterns in reviews rather than focusing on individual complaints. If multiple reviewers mention the same problem, such as wheel failures or valve leaks, take these warnings seriously. Pay attention to reviews from RVers with similar rigs and camping styles to yours, as their experiences will be most relevant to your situation. Reviews that include photos of tanks after extended use can reveal how well materials hold up over time.
Manufacturer responsiveness to customer issues indicates the level of support you can expect. Companies that actively respond to negative reviews and work to resolve customer problems demonstrate commitment to customer satisfaction. Check if the manufacturer maintains customer service phone lines, email support, or online chat assistance. The availability of instructional videos, user manuals, and troubleshooting guides on the manufacturer’s website suggests they invest in customer education and support beyond the initial sale.
Where to Buy Your Portable RV Dump Tank
Multiple purchase channels exist for portable RV dump tanks, each offering distinct advantages and considerations. Specialized RV dealers and outdoor recreation stores provide hands-on inspection opportunities where you can assess build quality, operate valves and closures, and evaluate wheel systems before purchasing. Sales staff at dedicated RV retailers typically have personal experience with the products and can offer informed recommendations based on your specific needs. The ability to take your tank home immediately rather than waiting for shipping provides convenience when you need equipment quickly.
Online retailers including Amazon, Camping World, and manufacturer direct websites offer competitive pricing and extensive selection that physical stores cannot match. The convenience of home delivery eliminates the need to transport a bulky tank from the store, though you sacrifice the ability to inspect before purchase. Read product descriptions carefully to verify what’s included—some online listings show tanks with accessories that must be purchased separately. Compare shipping costs between retailers since large items like portable tanks often incur significant freight charges that can negate advertised price advantages.
Ready to upgrade your RV waste management system? Shop our complete selection of portable RV dump tanks today and find the perfect solution for your camping needs. Compare features, capacities, and prices to make an informed decision that enhances your outdoor adventures.
Manufacturer direct purchase ensures you’re buying genuine products with full warranty coverage rather than risking counterfeits or gray market items. Many manufacturers offer exclusive accessories, extended warranties, or customer support benefits for direct buyers. Signing up for manufacturer email lists often provides access to seasonal sales, new product announcements, and exclusive discount codes that can result in significant savings on quality equipment.
Used portable waste tanks appear occasionally in RV classified ads, at garage sales, or through online marketplaces. While used tanks offer substantial cost savings, they carry significant risks. You cannot verify how the previous owner maintained the tank or whether hidden damage exists. Seals, valves, and hoses deteriorate over time even with proper care, and replacing these components can approach the cost of a new budget model. The lack of warranty coverage and unknown remaining lifespan make used tanks a risky proposition unless you’re experienced enough to conduct thorough pre-purchase inspections.
Essential Regulations and Best Practices for Waste Management
Understanding Legal Disposal Requirements
Proper waste disposal isn’t just about convenience or environmental consciousness—it’s a legal requirement with serious penalties for violations. Federal, state, and local regulations govern where and how you can dispose of RV waste, and ignorance of these laws doesn’t excuse violations. All RV waste must be disposed of at approved dump stations or facilities specifically designed to handle sewage. These facilities connect to municipal sewer systems or on-site treatment facilities with proper permits and environmental safeguards.
Dumping RV waste anywhere other than designated facilities is illegal nationwide and subject to substantial fines ranging from hundreds to thousands of dollars depending on jurisdiction and severity. Common illegal dumping locations that result in citations include storm drains (these flow directly to natural waterways without treatment), open ground or wooded areas, regular trash receptacles, and parking lot drains. Even small amounts of waste dumped improperly can contaminate water sources, create health hazards, and damage ecosystems. Law enforcement and campground rangers actively patrol for illegal dumping and investigate reports from other campers.
Proper portable tank transport requires following state and local regulations regarding waste container securing and transport routes. Most jurisdictions require waste containers to be sealed during transport and secured to prevent spillage in case of accidents. Some areas restrict transport of waste containers on certain highways or during specific hours. Check regulations for areas where you’ll be traveling, particularly when crossing state lines or entering national parks where additional federal regulations may apply.
Dump station etiquette matters as much as legal compliance for maintaining good relationships within the RV community. Common courtesy rules include limiting dump station time to 15-20 minutes when others are waiting, cleaning up any spills or drips you create, rinsing the dump station area after use if a rinse hose is provided, and never dumping trash, cigarette butts, or other non-waste items down the sewer connection. These practices keep facilities clean and functional for everyone and prevent campground operators from restricting dump station access or implementing usage fees.
Environmental Impact and Sustainable Practices
Responsible use of your portable RV dump tank extends beyond legal compliance to encompass environmental stewardship and sustainable practices. The chemicals you use in your holding tanks and portable waste tank affect wastewater treatment systems and, ultimately, the environment. Choose biodegradable, environmentally friendly tank treatments over harsh chemical formulations. Enzyme and bacteria-based treatments break down waste naturally without introducing toxic substances into treatment facilities or natural ecosystems.
Water conservation practices reduce the frequency of tank emptying and minimize your overall environmental impact. Low-flow showerheads, water-saving faucet aerators, and moisture sensor technology reduce water consumption without sacrificing comfort. Shorter showers, turning off water while soaping or brushing teeth, and using the foot-pedal toilet sparingly rather than holding it down for extended flushes all contribute to reduced waste generation. Some RVers adopt “navy showers” (wet down, turn water off, soap up, rinse off) that can reduce shower water usage by 75%.
Consider the lifecycle environmental impact when choosing tank materials and products. Tanks manufactured from recyclable materials, produced domestically to reduce transportation emissions, and designed for long-term durability rather than planned obsolescence represent more sustainable choices. Companies that offer replacement parts and repair services rather than requiring complete tank replacement when components fail demonstrate environmental responsibility that deserves support.
Proper disposal of cleaning products and chemicals used with your portable tank is as important as proper waste disposal. Never dump leftover tank treatment chemicals, cleaners, or sanitizers down storm drains or on open ground. Empty cleaning solutions at dump stations where they’ll be properly treated, or dispose of them according to local hazardous waste guidelines if they contain harsh chemicals. Keep a dedicated bucket for waste-related cleaning operations rather than using your fresh water containers to prevent cross-contamination.
Advanced Tips for Experienced RVers
Optimizing Your Dumping Schedule
Experienced RVers develop dumping schedules that balance convenience, campground regulations, and equipment longevity. Rather than dumping whenever tanks reach capacity, strategic timing can reduce dumping frequency and minimize unpleasant tasks. Many seasoned campers empty black tanks when they reach two-thirds full rather than waiting until completely full—this practice maintains adequate liquid volume for proper waste breakdown and prevents the pyramid plugging that occurs when solid waste stacks in too-empty tanks.
Coordinate your dumping schedule with other campground activities to maximize efficiency. Plan dumps before departure days when you’re already breaking camp and cleaning your RV, combining tasks to reduce overall effort. Some campgrounds charge fees for dump station use or limit frequency—understanding these policies helps you time dumps to minimize costs. If your campground offers honey wagon service (waste pumping for a fee), compare this cost against the time and effort of DIY dumping with your portable tank.
Monitor your gray water consumption patterns to predict filling rates and plan accordingly. Gray water typically fills much faster than black tanks, especially when using your RV shower regularly. Consider installing separate monitoring systems if your RV doesn’t have accurate tank level sensors. Many RVers develop intuition about tank fill levels based on days of use and number of occupants, allowing them to schedule dumps before tanks reach critical capacity.
Strategic water source usage affects tank filling rates significantly. When possible, shower at campground facilities rather than in your RV to reduce gray water generation. Use biodegradable soap products that are safe for gray water dumping in areas where regulations permit this practice. Some boondockers legally spread gray water on vegetation (where allowed) to extend time between full dumps, though this practice requires careful product selection and regulatory compliance.
DIY Modifications and Upgrades
Experienced users often modify portable tanks to address specific needs or improve functionality. Wheel upgrades represent the most common modification, replacing factory wheels with heavy-duty alternatives. Pneumatic wheels with sealed bearings provide superior performance over rough terrain, while solid rubber wheels eliminate flat tire concerns. Ensure replacement wheels match the axle diameter and load rating required for your tank’s full weight. Some RVers replace entire axle assemblies with units salvaged from hand trucks or dollies that feature more robust construction.
Custom towing adapters allow connection to vehicles, ATVs, or golf carts for transport distances that would be impractical for hand rolling. Fabricate adapters using steel tubing welded to match your vehicle’s hitch configuration. Ensure any custom adapter distributes the tank’s weight properly and includes safety chains or cables. Paint custom fabrications with rust-resistant coatings to prevent corrosion. Never exceed the 5 MPH maximum towing speed regardless of your towing vehicle’s capabilities—the tank and wheel assembly cannot withstand faster speeds.
Adding external tank level indicators provides real-time fill information during transfers. Simple sight tubes (clear plastic tubing mounted vertically along the tank side with connections at top and bottom) show liquid level through visual observation. Electronic level sensors with LED displays offer more sophisticated monitoring but require drilling the tank for sensor installation—proceed carefully to avoid compromising tank integrity. Calibrate any level indication system to account for liquid sloshing and provide warning before reaching absolute capacity.
Enhanced vent systems improve drainage speed significantly. Upgrade small factory vents with larger diameter alternatives that allow greater airflow. Some users install dual vents on opposite sides of the tank to eliminate vacuum effects entirely. Ensure any vent modifications include secure closures to prevent spills during transport. Add stainless steel mesh screens at vent openings to prevent insect entry during storage periods.
Storage solutions help organize the various hoses, adapters, and accessories associated with portable tank operation. Install PVC pipe holders or mesh bags attached to the tank body to keep hoses secure during transport. Create a dedicated storage tote for gloves, chemicals, cleaning supplies, and spare parts to keep everything organized and prevent cross-contamination with other gear. Label all components clearly to help family members or camping partners who may need to handle dumping operations in your absence.
Managing Multiple Tanks for Extended Boondocking
Serious boondockers and those engaging in extended off-grid camping sometimes utilize multiple portable tanks to extend time between civilization visits. A two-tank rotation system allows continuous waste management—while one tank holds fresh waste, the other has been dumped and cleaned and waits as backup. This approach proves especially valuable when dump station access requires significant travel or when you want to minimize trips to facilities during peak visitor periods.
Coordinating multiple tanks requires careful organization and labeling to prevent confusion about which tank holds what contents and when each was last emptied and cleaned. Number your tanks clearly and maintain a simple log noting fill dates and dump dates for each unit. Store empty, clean tanks separately from full tanks awaiting disposal to prevent mixing them up. Consider using different colored caps or identification markers for quick visual distinction between tanks.
The logistical challenges of managing multiple tanks include storage space requirements both during transport and at your campsite, increased total equipment investment, and greater weight impact on your vehicle’s carrying capacity. Two 25-gallon tanks weigh 50 pounds empty but approach 500 pounds when both are full—ensure your vehicle can safely handle this additional weight. Storage during travel requires securing both tanks properly to prevent damage from road vibrations and movement.
For some extreme boondocking situations, RVers construct custom tank trailers that carry multiple portable waste tanks plus fresh water storage. These dedicated utility trailers essentially create mobile utility stations that can be towed to dump facilities while leaving the main RV at the campsite. This sophisticated approach suits those spending months in remote locations but requires significant investment in equipment, trailer registration, and towing capacity.
Frequently Asked Questions About Portable RV Dump Tanks
What size portable RV dump tank do I need?
The ideal size depends on your RV’s holding tank capacity and camping style. Most RVers find 25-35 gallon tanks work well for standard travel trailers. Match or exceed your smallest holding tank capacity for flexibility in emptying either black or gray tanks completely.
How heavy is a full portable RV dump tank?
A full portable waste tank weighs approximately 8-9 pounds per gallon plus the tank’s empty weight. A 30-gallon tank weighs roughly 270-300 pounds when full, making quality wheels and proper transport methods essential for safe handling.
Can I tow a portable RV dump tank behind my car?
Yes, most portable waste tanks feature tow adapters for slow-speed towing. Never exceed 5 MPH when towing to prevent wheel damage and tank stress. For longer distances or higher speeds, secure the tank in a truck bed or trailer.
How often should I clean my portable RV dump tank?
Rinse your tank thoroughly after each use at the dump station. Perform deep cleaning with specialized cleaners monthly or whenever odors develop. Seasonal deep cleaning before storage ensures long-term sanitation and equipment longevity.
Are portable RV dump tanks legal everywhere?
Portable tanks themselves are legal, but waste disposal regulations vary by location. Always empty tanks only at designated dump stations or approved facilities. Dumping waste in unauthorized locations violates environmental laws and carries significant fines.
What’s the difference between 2-wheel and 4-wheel portable waste tanks?
Two-wheel tanks operate like hand trucks, requiring tilting for transport but offering easier storage. Four-wheel tanks provide better stability and allow upright rolling, making them easier to maneuver when full. Choose based on your campground terrain and physical capabilities.
Can I use my portable RV dump tank in freezing weather?
Empty and drain your tank completely before freezing temperatures occur. Water remaining in tanks, valves, or hoses can freeze and crack plastic components. Add RV antifreeze to valves and seals for winter storage protection.
Do I need special permits to transport RV waste?
Most jurisdictions don’t require special permits for portable waste tank transport, but you must secure tanks properly during transport. Some areas restrict waste transport routes or require specific securing methods—check local regulations before traveling.
How do I eliminate odors from my portable RV dump tank?
Regular cleaning prevents most odor issues. For persistent smells, use enzyme-based cleaners or a bleach solution soak, then rinse thoroughly. Add appropriate tank treatment chemicals after cleaning and ensure complete drying before storage.
What accessories do I need with my portable RV dump tank?
Essential accessories include a clear elbow adapter for monitoring fill level, appropriate length sewer hoses with secure fittings, protective gloves, and cleaning supplies. Many quality tanks come complete with necessary accessories in the package.
SEO Meta Description: Shop portable rv dump tank options for extended camping. Compare sizes, features and prices to find your ideal waste management solution for RV adventures.
Sources and Citations:
For more information about portable RV dump tanks and waste management solutions, visit reputable RV retailers such as Camping World, RV Parts Country, and manufacturer websites including Camco and Thetford.
For additional portable rv waste tank options and accessories, explore specialized outdoor equipment retailers.
Take Action Today: Don’t let limited dump station access restrict your camping adventures. Browse our selection of portable RV dump tanks now and find the perfect capacity and features for your needs. Invest in quality waste management equipment that enhances your freedom to explore remote destinations with confidence and convenience.