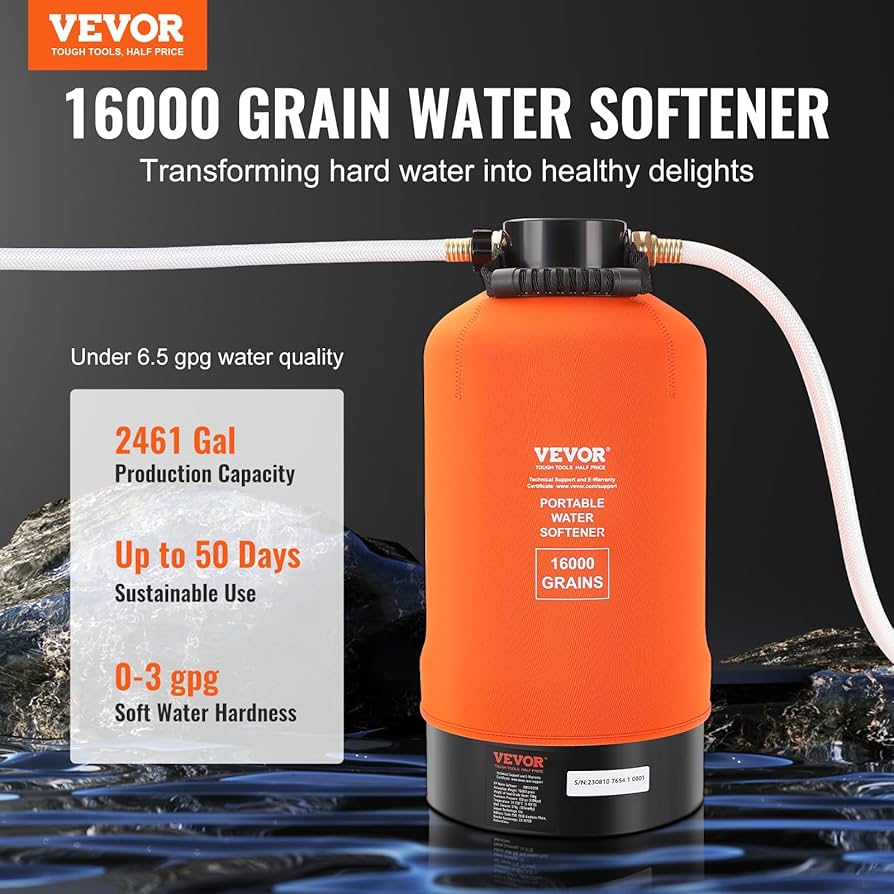
Hard water is a pervasive problem that affects millions of households and travelers across the United States, leaving behind stubborn mineral deposits, damaging appliances, and creating frustrating cleaning challenges. When you’re living the mobile lifestyle in an RV, sailing on a boat, or working at a remote job site, dealing with hard water becomes even more complicated because traditional whole-house water softening systems simply aren’t practical. This is where a portable water softener becomes an invaluable investment, offering the same mineral-reducing benefits as residential units but in a compact, travel-friendly package that can move with you wherever life takes you.
A portable water softener works by removing calcium, magnesium, and other hard water minerals through an ion exchange process, replacing them with sodium or potassium ions to create softer water that’s gentler on your skin, hair, clothing, and equipment. Unlike bulky residential systems that require professional installation and permanent plumbing modifications, portable models are designed for easy setup and can be connected directly to your RV’s water system, boat’s freshwater supply, or even a garden hose at a campground or temporary worksite.
The beauty of these compact systems lies in their versatility and mobility—you can enjoy the benefits of soft water whether you’re parked at a campground in the mountains, docked at a marina on the coast, or stationed at a construction site in the desert.
Understanding Hard Water and Why You Need Softening
Hard water contains elevated levels of dissolved minerals, primarily calcium and magnesium, which are picked up as water percolates through limestone, chalk, and gypsum deposits in the ground. The United States Geological Survey estimates that approximately 85% of American homes have hard water, with severity ranging from moderately hard (60-120 mg/L) to very hard (over 180 mg/L). These minerals cause a cascade of problems that affect everything from your morning shower to your appliances’ longevity, making water softening not just a luxury but a practical necessity for many people.
When hard water is heated or evaporates, the dissolved minerals crystallize and form scale deposits that accumulate inside pipes, water heaters, coffee makers, and other appliances. This scale buildup acts as an insulator in water heaters, forcing them to work harder and consume more energy to heat water—studies show that just 1/8 inch of scale buildup can increase energy costs by 20-30%. Beyond energy efficiency concerns, hard water prevents soap and detergent from lathering properly because the minerals react with soap to form an insoluble precipitate called soap scum, which means you need to use significantly more cleaning products to achieve the same results.
This soap scum doesn’t just waste money on extra products; it also leaves residue on dishes, creates that frustrating bathtub ring, makes laundry feel stiff and look dingy, and can even clog your skin’s pores leading to dryness and irritation.
For RV enthusiasts and boaters, hard water presents additional challenges because the confined plumbing systems in recreational vehicles are more susceptible to scale damage, and replacing components in these specialized systems is typically more expensive than residential repairs. Mobile living means you’ll be connecting to different water sources at various locations, each with its own mineral content, making it impossible to predict water quality or adapt your routines accordingly. A portable water softener provides consistent water quality regardless of where you connect, protecting your valuable RV or boat plumbing investments while ensuring you always have comfortable water for daily living activities.
How Portable Water Softeners Work: The Science Behind Soft Water
The ion exchange process that powers portable water softeners is the same proven technology used in residential water treatment systems, just packaged in a more compact and mobile-friendly format. Inside every water softener is a tank filled with specialized resin beads that are negatively charged and initially covered with sodium ions (or potassium ions if you’re using potassium chloride salt). As hard water flows through the resin bed, the calcium and magnesium ions—which carry a positive charge—are attracted to the negatively charged resin beads and stick to them, while the sodium ions are released into the water in exchange.
This exchange happens continuously as water flows through the system, with thousands of resin beads capturing hard water minerals and releasing sodium until the beads become saturated with calcium and magnesium and can no longer effectively soften water. At this point, the system needs to be regenerated through a process called backwashing, where a strong salt brine solution is flushed through the resin tank. The high concentration of sodium in the brine solution overwhelms the calcium and magnesium ions, forcing them off the resin beads and flushing them down the drain, while simultaneously recharging the beads with fresh sodium ions ready to soften water again.
Portable water softeners differ from residential systems primarily in their size, regeneration method, and portability features. Most portable units use manual regeneration, meaning you’ll need to add salt and initiate the backwash cycle yourself rather than having an automatic timer do it for you. This manual process actually offers advantages for travelers because you have complete control over when regeneration occurs and can plan it around your water usage patterns and location—you probably don’t want to regenerate while camping in a pristine wilderness area, for example.
The compact design typically means these units have smaller resin tanks that treat fewer gallons between regenerations, but this trade-off is acceptable for most mobile applications where water consumption is naturally lower than residential use.
Key Features to Look for in a Portable Water Softener
Choosing the right portable water softener requires understanding several critical specifications that will determine whether a particular model meets your needs and usage patterns. The grain capacity is perhaps the most important specification because it directly indicates how much hardness the unit can remove before requiring regeneration. Grain capacity refers to the total number of grains of hardness (where one grain equals 1/7000th of a pound) the resin can remove in a single cycle, with portable units typically ranging from 8,000 to 16,000 grains.
To determine the appropriate grain capacity for your situation, you need to know your water hardness level (measured in grains per gallon or parts per million) and your daily water consumption. For example, if you’re using 30 gallons per day and your water hardness is 10 grains per gallon, you’re introducing 300 grains of hardness daily. A 10,000-grain portable water softener would theoretically last about 33 days between regenerations (10,000 ÷ 300 = 33.3), though most manufacturers recommend regenerating before complete exhaustion to maintain optimal performance. RV users typically find that units in the 8,000-16,000 grain range provide a good balance between capacity and portability, while boaters might opt for smaller units due to space constraints.
Flow rate is another crucial consideration that determines how quickly water moves through the softener, measured in gallons per minute (GPM). Portable water softeners typically offer flow rates between 3-10 GPM, which may seem low compared to residential systems that can handle 15-20 GPM, but is usually adequate for RV and marine applications where you’re typically using one fixture at a time. A flow rate that’s too low will result in weak water pressure at your faucets and shower, while oversizing the flow rate relative to your grain capacity will cause water to move through the resin too quickly for effective softening. Most RV users find that 5-7 GPM provides comfortable water pressure while maintaining good softening efficiency.
The regeneration process varies significantly between portable models and directly impacts user convenience. Some portable water softeners use a simple two-hose system where you connect one hose to a water source and another to a drain, then open valves to flush salt brine through the resin tank. Others feature more sophisticated regeneration systems with multiple cycles including backwash, brine draw, slow rinse, and fast rinse sequences.
While more complex regeneration systems are generally more effective at cleaning and recharging the resin, they also require more time (typically 90-120 minutes) and use more water. Consider whether you’ll have reliable access to water and drain facilities when regeneration is needed, and whether you can spare the time and water for the process.
Essential Portable Water Softener Components
| Component | Function | Important Considerations |
|---|---|---|
| Resin Tank | Houses ion exchange beads that capture minerals | Capacity determines gallons treated; compact size crucial for portability |
| Brine Tank | Stores salt for regeneration cycles | May be integrated or separate; affects overall footprint |
| Control Valve | Manages water flow and regeneration cycles | Manual vs. automatic; ease of use varies by design |
| Inlet/Outlet Ports | Connects to water supply and distribution | Standard hose threads (3/4″) most common and versatile |
| Bypass Valve | Allows water to skip softener when not needed | Essential for maintenance and when soft water not required |
Top Portable Water Softener Models Compared
The market for portable water softeners has expanded considerably as more people embrace mobile lifestyles, with several manufacturers offering purpose-built units designed specifically for RV, marine, and portable applications. The Watts Premier RV PRO-1000 has earned its reputation as one of the most popular choices among RV enthusiasts, offering 10,000 grain capacity in a compact footprint that fits easily in RV storage compartments or can be mounted externally. This unit features standard 3/4-inch hose connections that work with typical RV water hookups, includes built-in bypass valves for convenient switching between soft and hard water, and uses a straightforward regeneration process that most users can complete in about 30 minutes once they’re familiar with the procedure.
The On The Go OTG4-DBLSOFT takes a different approach with its dual-tank design that provides 16,000 grain capacity by stacking two 8,000-grain tanks vertically, making it ideal for families or extended trips where water consumption is higher. This model’s innovative design allows you to regenerate one tank while continuing to use the other, eliminating downtime and ensuring you always have access to soft water. The trade-off is increased weight and size—at approximately 30 pounds when empty and requiring about 14 inches of vertical clearance, it may not suit smaller RVs or boats, but for larger motorhomes and fifth wheels, it offers excellent capacity without requiring frequent regenerations.
For boaters and those with extreme space constraints, the ABC Waters Portable Water Softener offers a more compact 8,000-grain solution that weighs just 18 pounds empty and features a slim profile that can fit into tight marine storage areas. While the lower capacity means more frequent regenerations—typically every 7-14 days for two people—the unit’s simplicity and reliable performance make it a favorite among cruising sailors and small RV owners who prioritize space savings over maximum capacity. This model uses a basic two-hose regeneration system that’s intuitive to operate and requires no special tools or fittings.
Commercial-grade portable models like the Nature2 Fusion Soft Water incorporate additional filtration technologies beyond basic softening, combining ion exchange with carbon filtration to remove chlorine, sediment, and odors alongside hardness minerals. These multi-stage systems appeal to users who want comprehensive water treatment in a single portable package, though they typically command premium prices and require more complex maintenance with multiple filter cartridges to monitor and replace. The investment makes sense if you frequently encounter poor-quality water with both hardness and contamination issues, but may be overkill if your primary concern is simply reducing mineral content.
Installation and Setup: Getting Your Portable Water Softener Running
Installing a portable water softener in your RV or boat is remarkably straightforward compared to residential water treatment systems, typically requiring no special plumbing skills or permanent modifications to your vehicle’s water system. The most common installation method for RV users involves connecting the softener between your campground water spigot and your RV’s fresh water inlet, creating an inline treatment system that processes all water entering your RV. You’ll need a standard garden hose to connect from the water source to the softener’s inlet port, and another hose from the softener’s outlet to your RV connection, with most units including the necessary hose washers and fittings to create leak-free connections.
Before connecting your portable water softener, it’s essential to prepare the resin by performing an initial regeneration cycle even though the unit is new from the factory. Manufacturing and shipping can cause the resin beads to compact and accumulate dust or debris, and the initial regeneration ensures the beads are properly charged with sodium and ready to soften water effectively. Fill the brine tank with water softener salt (sodium chloride or potassium chloride, depending on your preference), following the manufacturer’s specifications for salt quantity—typically 4-6 pounds for most portable units. Add water to create a brine solution, usually 2-3 quarts, and allow it to dissolve for several hours or overnight before initiating the regeneration cycle.
The regeneration process itself involves connecting a water supply hose to the inlet and a drain hose to the outlet (or routing it to an appropriate drain area), then opening the regeneration valves according to your specific model’s instructions. Water will flow through the system in a specific sequence—usually backwash first to loosen compacted resin and flush out debris, then brine draw where the salt solution flows through the resin tank, followed by rinse cycles to flush away excess salt and hardness minerals.
Suggested read: Portable vs Built-in RV Black Water Tanks: Which Saves You More Money Long-Term?
During this process, you’ll hear water flowing and may see cloudy or dirty water initially, which is normal as the system purges accumulated minerals and prepares for service. Most regeneration cycles take 60-120 minutes and use 20-40 gallons of water, so plan accordingly and ensure you have adequate water supply and drainage capacity.
Pressure regulation is a critical consideration that many first-time users overlook, potentially leading to damage or premature failure of portable water softeners. Campground water pressure can vary dramatically from site to site, with some locations delivering 80-100 PSI while others barely reach 40 PSI, and most portable water softeners are designed to operate optimally at 45-60 PSI. Excessive pressure can damage seals, cause leaks, and force water through the resin bed too quickly for effective softening, while insufficient pressure results in weak flow rates and poor performance.
Installing an inline pressure regulator between the water source and your softener (which you should have for your RV anyway) protects both the softener and your RV’s plumbing from pressure fluctuations, and typically costs only $15-25 for a quality adjustable model.
Maintenance and Care: Keeping Your System Running Efficiently
Regular maintenance determines whether your portable water softener provides years of reliable service or becomes a frustrating money pit, and fortunately, these systems require relatively minimal upkeep when operated correctly. The most frequent maintenance task is monitoring salt levels in the brine tank and replenishing as needed, typically before each regeneration cycle. Using high-quality water softener salt is crucial because impurities in low-grade salt can accumulate in the brine tank and potentially contaminate the resin bed, leading to reduced softening capacity and performance issues over time. Solar salt pellets or evaporated salt pellets are preferred over rock salt because they contain fewer impurities and dissolve more completely, leaving less residue in the tank.
Resin bed cleaning is an often-overlooked maintenance task that can significantly extend the life and effectiveness of your portable water softener. Over time, the resin beads can become fouled with iron, manganese, sediment, and organic matter that regular regeneration cycles don’t completely remove. This fouling gradually reduces the resin’s ion exchange capacity, meaning your softener treats fewer gallons between regenerations and eventually stops softening water effectively even after regeneration.
Using a resin cleaner—typically a citric acid or specialized resin cleaning solution—every 6-12 months helps dissolve these accumulated contaminants and restore the resin’s full softening capacity. The cleaning process involves adding the cleaner to the brine tank with water and running a regeneration cycle, and is especially important if you’ve been using the softener with water that contains iron or other contaminants.
Winterization is essential if you live in a climate where temperatures drop below freezing or if you store your RV or boat during winter months. Water remaining in the softener can freeze, expand, and crack the tank or damage valves and seals, potentially destroying the unit. Proper winterization involves draining all water from the system, blowing out remaining water with compressed air (keeping pressure below 30 PSI to avoid damaging components), and adding RV antifreeze to protect any water that might remain in valve mechanisms or small passages.
Some users prefer to completely remove the softener from their RV system and store it indoors during winter, which provides maximum protection and makes it easy to perform maintenance tasks like resin cleaning during the off-season.
Storage between trips requires some consideration beyond just parking your RV or securing your boat. If you’ll be storing your RV for more than a few weeks without using the water system, most manufacturers recommend leaving the softener in a regenerated state with fresh salt in the brine tank, which keeps the resin properly charged and prevents bacterial growth.
However, you should also ensure the system is drained to prevent stagnant water issues, creating a slight contradiction that’s best resolved by regenerating immediately before storage, draining thoroughly, and then regenerating again when you’re ready to use the system. For extended storage periods of several months, some users prefer to remove the softener entirely and store it in a climate-controlled area to minimize potential degradation of seals and o-rings.
Portable Water Softener Maintenance Schedule
- Before each use: Check salt levels; inspect hoses and connections for leaks
- Every 7-30 days (depending on capacity): Perform regeneration cycle
- Monthly: Clean brine tank; check for salt bridging or mushing
- Every 3-6 months: Test water hardness to verify system performance
- Every 6-12 months: Clean resin bed with specialized cleaner
- Annually: Replace any worn hoses or fittings; inspect valves and seals
- Before winter storage: Complete winterization procedure; drain all water
Cost Analysis: Investment and Operating Expenses
The initial investment in a portable water softener ranges from approximately $150 for basic compact models to $500 or more for premium units with larger capacities and advanced features. This price range is significantly lower than residential water softening systems, which typically cost $1,000-3,000 including installation, making portable options an economical choice even if you only use them seasonally. When evaluating cost, consider not just the purchase price but also the value of protecting your RV or boat’s plumbing system from scale damage, which can cost thousands of dollars to repair if mineral buildup damages water heaters, faucets, and pipes.
Operating costs for portable water softeners are minimal, consisting primarily of water softener salt and water used during regeneration. A 40-pound bag of quality water softener salt costs $5-10 and typically provides enough material for 8-10 regeneration cycles, working out to less than $1 per regeneration. Each regeneration uses 20-40 gallons of water depending on the system and cycle settings, which translates to $0.10-0.40 in water costs at typical campground rates. If you regenerate every two weeks during a six-month camping season (13 regenerations), your annual operating costs would be approximately $13-26 for salt plus nominal water costs—far less than the cost of replacing scale-damaged appliances or dealing with hard water problems.
The long-term financial benefits of using a portable water softener extend beyond just avoiding repair costs. Soft water allows soaps and detergents to work more effectively, potentially reducing your consumption of these products by 50% or more compared to hard water. Soft water also prolongs the life of clothing by preventing the mineral buildup that causes fabrics to become stiff and wear out prematurely, and helps water heaters operate more efficiently by preventing scale accumulation that insulates heating elements and forces them to work harder.
When you factor in these ongoing savings plus the improved quality of life benefits like softer hair, smoother skin, and cleaner dishes, the return on investment for a portable water softener becomes compelling even within the first year of use.
Health and Environmental Considerations
Understanding the health implications of softened water helps address common concerns and misconceptions about water treatment systems. The ion exchange process replaces calcium and magnesium with sodium, which does increase the sodium content of your water, but the actual amount added is proportional to the water’s original hardness level. For moderately hard water (7 grains per gallon), a portable water softener adds approximately 82 milligrams of sodium per liter, while very hard water (20 grains per gallon) would result in about 234 milligrams per liter. For context, one slice of bread typically contains 100-200 milligrams of sodium, meaning you’d need to drink a substantial amount of softened water to match the sodium content of common foods.
People on sodium-restricted diets or those concerned about sodium intake have several options to address this consideration. The most common approach is using potassium chloride instead of sodium chloride for regeneration, which substitutes potassium ions for sodium ions in the exchange process. Potassium chloride costs 2-3 times more than sodium chloride salt, but provides the same softening benefits without adding sodium to your water, making it an excellent choice for anyone monitoring sodium intake for health reasons.
Alternatively, you can install the softener so it only treats hot water, leaving cold water hard for drinking and cooking, or use a separate drinking water filter for your kitchen tap to remove both the added sodium and any residual hardness if desired.
Environmental impact of water softeners has sparked debate, primarily centered on the salt brine discharge during regeneration and the water consumption required for backwashing. Each regeneration cycle flushes sodium chloride or potassium chloride into wastewater systems, and while this is generally considered safe for septic systems and municipal treatment plants, some environmentally sensitive areas have restrictions on salt discharge.
When camping or boating, be mindful of where regeneration wastewater goes—never regenerate in a way that allows brine to discharge directly into natural waterways, pristine wilderness areas, or environmentally sensitive locations. Most campgrounds have adequate infrastructure to handle salt brine in their sewer systems, but when boondocking or dry camping, plan to regenerate at a proper facility rather than in a remote location.
Water consumption during regeneration represents another environmental consideration, with each cycle using 20-40 gallons that’s ultimately discharged as wastewater. This seems wasteful on the surface, but consider the alternative: without soft water, you’ll use significantly more water for cleaning because soap doesn’t lather effectively in hard water and more rinsing is required to remove soap scum. Studies suggest households with hard water use 20-30% more water for bathing and cleaning compared to those with soft water, potentially offsetting the water used for regeneration. Additionally, the energy savings from preventing scale buildup in water heaters and the extended lifespan of appliances represent environmental benefits that should be factored into any comprehensive impact assessment.
Troubleshooting Common Portable Water Softener Problems
Even well-maintained portable water softeners occasionally develop problems, and understanding how to diagnose and resolve common issues keeps your system running smoothly. Water remains hard after regeneration is one of the most frustrating problems users encounter, and can stem from several causes. First, verify that you’re actually regenerating the unit correctly by carefully following the manufacturer’s procedure, including waiting the full cycle time and ensuring adequate salt and water are present in the brine tank. If you’ve confirmed proper regeneration, test the incoming water hardness to ensure it hasn’t exceeded your expectations—if you thought you had 10-grain water but it’s actually 20-grain, your softener will exhaust its capacity much faster than anticipated and may already need regeneration again.
Resin bed fouling can also cause reduced softening performance even with proper regeneration. If your water source contains iron, manganese, or high levels of sediment, these contaminants accumulate on the resin beads and block the ion exchange sites where calcium and magnesium are captured. The solution is performing a resin cleaning cycle with a specialized cleaner or citric acid solution, which dissolves these deposits and restores the resin’s softening capacity. In extreme cases where the resin is severely fouled or damaged, replacement may be necessary, though this is uncommon with portable units that aren’t subjected to the continuous high-volume use that residential systems experience.
Low water pressure or flow through your portable water softener indicates potential blockages or improper setup that needs addressing. Check that all valves are fully open and positioned correctly—some softeners have bypass valves that partially close the flow path if not properly set to service mode. Inspect hoses for kinks, twists, or obstructions that could restrict flow, and verify that your inlet screen hasn’t become clogged with sediment (a common problem when connecting to campground water supplies with poor filtration).
Suggested read: Portable Sink with Water Tank: Everything You Need to Know for Mobile Handwashing Solutions
If the system is newly installed and has never provided good flow, you may have purchased a model with insufficient flow rate for your needs, or your incoming water pressure might be too low to push water through the resin bed at an acceptable rate.
Salt bridging occurs when a hard crust forms in the brine tank above the water level, creating a hollow space beneath where salt isn’t dissolving properly. This prevents proper brine concentration during regeneration, resulting in incomplete resin recharging and hard water output. You can identify salt bridging by pushing a broom handle down into the salt—if it breaks through a hard layer and continues easily below, bridging has occurred. Fix this by breaking up the salt crust, removing any remaining salt, cleaning the brine tank thoroughly, and refilling with fresh salt while ensuring the water level is correct (usually just enough to cover the bottom of the tank, not submerging all the salt).
Comparing Portable Water Softeners to Alternative Solutions
Several alternatives to portable water softeners exist for RV and marine applications, each with distinct advantages and limitations that make them suitable for different situations. Portable water filters remove sediment, chlorine, and contaminants but do not address hardness minerals, making them inadequate if your primary concern is preventing scale buildup and improving soap lathering. However, combining a sediment/carbon filter before your water softener provides excellent comprehensive treatment, with the filter protecting the softener’s resin from fouling while the softener handles mineral removal. This dual-system approach costs more upfront but delivers superior water quality and extends the life of both components.
Electronic or magnetic water conditioners claim to alter the structure of calcium and magnesium minerals so they don’t form scale deposits, without actually removing the minerals from the water. These devices are controversial because independent testing has produced mixed results, with some studies showing modest scale reduction while others find no measurable benefit.
The appeal of these systems is their maintenance-free operation and compact size, but they don’t provide the comprehensive benefits of true water softening—your water will still have high mineral content that affects soap performance, leaves spots on dishes, and feels harsh on skin. Electronic descalers might work as supplemental protection for your RV’s plumbing, but shouldn’t be considered equivalent to a portable water softener for full-time use.
Chemical water softeners in the form of detergent additives or in-line chemical feed systems offer another approach, using compounds like sodium hexametaphosphate to sequester hardness minerals and prevent scale formation. These systems are inexpensive and require no regeneration, but the chemicals must be continuously replenished and add to your water’s chemical load. They’re most appropriate for temporary situations or as a backup when your portable water softener is being serviced, rather than as a primary long-term solution. The chemical approach also doesn’t provide the same skin and hair softening benefits as ion exchange softening because the minerals are still present in the water, just chemically altered to reduce scaling.
For those interested in other portable solutions for travel and outdoor living, exploring options like a ge portable room air conditioner can enhance comfort in various mobile living situations, complementing your water treatment setup with climate control capabilities.
Real-World User Experiences and Case Studies
John and Sarah Martinez have been full-time RV living enthusiasts for five years, traveling across the United States in their 35-foot motorhome and experiencing water quality ranging from pristine mountain springs to heavily mineralized desert well water. They installed an On The Go OTG4-DBLSOFT portable water softener after their original RV water heater failed prematurely due to severe scale buildup, a $1,200 repair that could have been prevented. “The difference was immediately noticeable,” Sarah explains. “Our hair felt softer after showers, dishes came out spotless without water spots, and we could actually see soap suds when washing dishes instead of that weird scummy feeling we’d gotten used to.
” Over three years of use, they regenerate their softener approximately every 10-14 days depending on their water consumption and the hardness level at each location, and estimate they’ve saved hundreds of dollars in soap, detergent, and bottled water while avoiding costly appliance repairs.
Captain Mike Stevens operates a 42-foot sailboat that he charters in the Caribbean, where water quality varies dramatically from island to island. He initially resisted installing a portable water softener because of space constraints in his boat’s systems area, but finally relented after hard water destroyed a high-end coffee machine and created persistent scale problems in his boat’s water maker. “I chose a compact 8,000-grain unit that fits in a locker under the galley sink,”
Mike notes. “Yes, I have to regenerate it more frequently than RV users might—about every 5-7 days with two people on board—but the protection it provides to my desalination equipment alone justifies the investment.” He particularly appreciates that soft water makes cleaning salt spray off windows and surfaces much easier, as soap actually works properly and rinses completely clean rather than leaving residue.
The Thompson family’s experience illustrates how a portable water softener can solve specific problems even for occasional RV users. They purchased their travel trailer for summer camping trips and weekend getaways, using it about 40 days per year at various campgrounds. Their daughter Emily has eczema that worsens with hard water exposure, making their RV trips uncomfortable before they invested in a portable softening system.
“We did our research on water softeners and decided on an ABC Waters 8,000-grain model because of its compact size and simple operation,” explains Dave Thompson. “The improvement in Emily’s skin condition was remarkable—she could finally enjoy camping without the irritation and itching that hard water caused. As a bonus, we noticed our RV’s shower and sink stayed much cleaner between trips, with no mineral buildup or water spots to scrub away.”
Advanced Tips for Maximizing Portable Water Softener Performance
Experienced RV and marine users have developed several strategies for optimizing portable water softener performance beyond basic operation. Pre-filtering incoming water before it enters your softener dramatically extends resin life and reduces regeneration frequency by removing sediment, rust particles, and other contaminants that can foul the resin bed. A simple inline sediment filter (5-micron or finer) costs $20-40 and installs in minutes between your water source and softener inlet, catching particulates before they reach the resin. Change this pre-filter regularly—monthly or when water flow noticeably decreases—to maintain protection, and you’ll find your softener performs more consistently and requires less frequent maintenance.
Hardness testing enables precise regeneration timing rather than relying on generic schedules or guesswork. Water hardness test kits cost $10-20 and provide accurate measurements of your water’s mineral content, allowing you to calculate exactly how many gallons your softener should treat before exhausting its capacity. Test the water at each new location when you arrive, document the hardness level, and use this data to predict when regeneration will be needed. Some users maintain a log of water hardness at their favorite campgrounds and marinas, creating a reference guide that eliminates uncertainty and ensures they regenerate before the resin becomes completely exhausted.
Strategic bypass valve usage helps conserve your softener’s capacity and extends the time between regenerations. Most portable water softeners include a bypass valve that allows water to flow around the softener rather than through it, and smart users leverage this feature for activities that don’t require soft water. Filling fresh water tanks, washing the exterior of your RV, or watering plants are examples where soft water provides no benefit, so bypassing the softener for these tasks preserves your grain capacity for applications where it actually matters—showers, dishes, and laundry. This approach can easily extend your regeneration interval by 30-50% with no impact on quality of life.
Optimizing regeneration efficiency involves several advanced techniques that professional water treatment technicians use but many portable softener users overlook. First, ensure your brine solution is properly concentrated by using the correct salt-to-water ratio (typically 2-3 pounds of salt per gallon of water) and allowing adequate time for dissolution before initiating regeneration. Second, consider performing a longer slow-rinse cycle than the minimum recommended, which more thoroughly flushes hardness minerals from the resin and results in better softening performance. Finally, if your portable water softener allows it, increase the backwash duration periodically to lift and separate resin beads, preventing them from compacting and channeling where water flows through preferred paths rather than contacting all the resin uniformly.
Portable Water Softeners for Different Applications
Different portable lifestyles require different approaches to water softening, and understanding application-specific considerations helps you select and configure the right system. Class A and Class C motorhome users typically have the most flexibility for portable water softener installation because these RVs offer larger storage compartments and more generous payload capacities. A 12,000-16,000 grain system makes sense for these larger RVs, especially if you’re traveling with family and have high water consumption. The dual-tank approach exemplified by the On The Go model works particularly well for Class A motorhomes where you can dedicate a basement storage bay to water treatment equipment, allowing you to regenerate one tank while using the other and essentially ensuring unlimited soft water availability.
Travel trailer and fifth wheel owners face payload and space constraints that often favor smaller, lighter softener models in the 8,000-10,000 grain range. The key consideration is mounting location—some users permanently mount their softener in a pass-through storage compartment with quick-disconnect fittings for easy connection, while others prefer to store it loose and set it up at each campsite. External setup has the advantage of preserving cargo space and allowing you to regenerate at the campsite’s water spigot rather than your RV’s connection, but requires careful attention to weather protection and security. Always lock valuable equipment and consider covering your softener with a protective tarp or storage bag when set up outdoors for extended periods.
Boaters and marine applications present unique challenges because space is even more limited than RVs, and the saltwater environment accelerates corrosion of metal components. Look for portable water softeners with corrosion-resistant materials like stainless steel fittings and composite housings rather than painted steel, which will quickly deteriorate in the marine environment. Compact units that can be permanently mounted in engine rooms or storage lockers work better than larger systems that must be moved and set up, and consider installing your softener so it only treats water going to fixtures rather than also processing water that fills your boat’s tanks—this conserves capacity and ensures soft water where it provides maximum benefit.
Job site and temporary construction applications require rugged, simple portable water softeners that can withstand rough handling and require minimal maintenance from users who may not be water treatment experts. Look for units with heavy-duty housings, protected valves, and straightforward regeneration procedures that can be taught to crew members in minutes.
Capacity should be sized based on the number of workers and duration between opportunities to regenerate—a construction crew of 10 people might need a 16,000-grain unit if regeneration facilities aren’t readily accessible, while smaller crews with regular access to water and drainage can use smaller systems. Consider whether your job site has consistent access to salt supplies, as running out of salt at a remote location can leave you without soft water until you can source more.
Emergency preparedness and disaster relief scenarios represent an often-overlooked application for portable water softeners. When natural disasters disrupt municipal water treatment or force evacuation to temporary housing, a portable water softener can make marginally-potable hard water much more pleasant to use for hygiene and cleaning. While softeners don’t purify water or remove biological contaminants (always disinfect questionable water sources), they dramatically improve usability by removing minerals that interfere with soap and cause skin irritation. Emergency preparedness experts who maintain comprehensive supplies increasingly include compact water softeners in their equipment caches, recognizing that maintaining hygiene and morale during extended emergencies requires more than just having water—it requires having usable water.
Seasonal residents and snowbirds who split time between permanent homes and RVs or vacation properties benefit from portable water softeners’ flexibility. Rather than installing separate permanent systems at each location, a quality portable unit can move between locations as needed, providing consistent soft water whether you’re at home, your vacation cottage, or traveling in your RV. This approach requires more setup effort when transitioning between locations, but saves the expense of multiple systems and ensures you’re never without soft water. Some snowbirds maintain two identical portable softener units—one permanently installed in their RV and another at their winter destination—ensuring they always have soft water without the hassle of installation and removal.
Suggested read: The Ultimate Portable Mirror Buying Guide: Transform Your Beauty Routine Anywhere
Understanding Water Quality Beyond Hardness
While hardness is the primary concern that drives people to purchase portable water softeners, understanding other water quality parameters helps you create a comprehensive treatment strategy. Iron content is particularly problematic because it fouls water softener resin even at relatively low concentrations of 0.3-0.5 parts per million. Iron exists in water as either ferrous (dissolved, clear water iron) or ferric (oxidized, visible red-brown particles), and both forms damage softeners through different mechanisms. Ferrous iron bonds to resin beads during the softening process, gradually coating them with iron deposits that block ion exchange sites and reduce capacity, while ferric iron acts as an abrasive that physically damages resin structure.
If your water source contains iron above 0.3 PPM, you should install an iron filter before your portable water softener to protect the resin and maintain performance. Iron filters use oxidation and filtration to remove iron before it can reach the softener, and are available in compact portable formats suitable for RV and marine applications. The additional investment of $100-200 for a portable iron filter pays dividends by eliminating the need for frequent resin cleaning and replacement, and prevents the characteristic orange staining that iron causes in sinks, showers, and toilets.
Chlorine is added to most municipal water supplies for disinfection and is also present in campground water systems, but excessive chlorine exposure gradually degrades water softener resin, shortening its lifespan. While softeners can handle the chlorine levels typically found in treated water, adding a carbon filter before your softener removes chlorine and protects the resin while also improving water taste and odor. The carbon filter serves double duty by also capturing organic compounds and some chemicals that might otherwise reach and contaminate your softener resin, making it a valuable addition that costs only $30-50 for a basic inline carbon filter unit.
Total dissolved solids (TDS) measure all minerals and substances dissolved in water, not just hardness minerals, and extremely high TDS levels can overwhelm a portable water softener’s capacity. Water with TDS above 1,000 PPM is considered problematic, and above 2,000 PPM may be unsuitable for softening with a standard portable unit. If you encounter water with very high TDS—common in some desert regions and coastal areas—you may need to use bottled water for drinking and cooking while using your softener for bathing and cleaning, or consider supplementing with reverse osmosis filtration for drinking water. Always test TDS along with hardness when evaluating water sources, as it provides important context about overall water quality.
Water Quality Parameters Reference Guide
| Parameter | Measurement | Concern Level | Impact on Softeners |
|---|---|---|---|
| Hardness | Grains per gallon (GPG) or PPM | >7 GPG = hard | Direct impact on capacity and regeneration frequency |
| Iron | Parts per million (PPM) | >0.3 PPM = problematic | Fouls resin; requires pre-filtration for protection |
| Chlorine | PPM | >2 PPM = high | Degrades resin over time; carbon filter recommended |
| pH | 0-14 scale | <6.5 or >8.5 = outside ideal range | Extreme pH can damage components and reduce efficiency |
| TDS | PPM | >1,000 PPM = high | Very high TDS may overwhelm softener capacity |
| Manganese | PPM | >0.05 PPM = problematic | Similar to iron; fouls resin and causes staining |
Maximizing Space and Portability
Successfully integrating a portable water softener into limited RV or boat space requires creative thinking and careful planning. Vertical mounting takes advantage of underutilized vertical space in many RVs, with some users successfully mounting compact softeners on the walls of pass-through storage compartments or in basement areas using custom brackets. This approach keeps the softener secure during travel while making it easily accessible for regeneration and maintenance without having to dig through stored items. Ensure any mounted softener is properly supported for the weight when filled with water and resin—typically 35-50 pounds—and use vibration-resistant fasteners since RVs experience significant movement and vibration during travel.
Quick-disconnect fittings transform portable water softener setup from a time-consuming chore into a 30-second task, making it practical to connect and disconnect the system frequently if needed. Replace your standard hose connections with camlock fittings or push-to-connect quick disconnects, which allow you to attach or remove the softener with a simple quarter-turn or push rather than threading hose connections. This is particularly valuable if you store your softener in a different location during travel and set it up only when parked, or if you frequently need to bypass the softener for certain tasks. Quality quick-disconnect fittings cost $20-40 for a complete set but pay for themselves in convenience within a few uses.
Multi-purpose storage solutions help justify the space a portable water softener occupies in cramped RVs and boats. Some creative users have integrated their softener into custom storage boxes that also serve as step stools for accessing upper storage compartments, or built enclosures that double as small tables when set up at campsites. The brine tank can store small items like hose washers, pressure gauges, and water testing supplies when not filled with salt, keeping related accessories organized in one location. Think creatively about how your softener’s storage location can serve multiple purposes rather than being dedicated single-use space.
Seasonal storage strategies for users who only operate their RV or boat part of the year should focus on protecting the softener during off-season months while minimizing storage space. Some users remove their portable water softeners entirely during winter storage and keep them in climate-controlled spaces at home, which allows for thorough maintenance including resin cleaning and seal inspection while the unit is easily accessible. Others prefer leaving the softener installed but properly winterized in the RV, which saves the effort of removal and reinstallation but requires careful attention to drainage and freeze protection. Consider your specific situation—if you have adequate home storage and your RV storage area experiences temperature extremes, bringing the softener indoors probably makes sense.
Making the Purchase Decision: Finding Your Ideal Portable Water Softener
When you’re ready to invest in a portable water softener, systematically evaluating your needs and options ensures you select a system that delivers satisfaction rather than frustration. Start by calculating your actual water usage over a typical period, which provides the foundation for capacity selection. Most RV users consume 20-40 gallons per person per day when connected to hookups with unlimited water, though this varies based on showering habits, cooking practices, and whether you wash the RV or vehicles regularly. Multiply your daily usage by the number of days you’d like to go between regenerations (most users target 10-14 days as a good balance), then multiply by your typical water hardness to get total grains of capacity needed.
Budget considerations extend beyond purchase price to include long-term operating costs and the value of protecting your RV or boat’s plumbing investments. While basic portable water softeners start around $150, these entry-level units often have lower capacities, require more frequent regeneration, and may lack convenience features like integrated bypass valves or quick-connect fittings. Spending $250-350 for a mid-range unit typically delivers substantially better value through larger capacity, more robust construction, and features that make the system easier to use and maintain. Premium models above $400 are harder to justify unless you need their specific capabilities like dual-tank designs or integrated filtration, as the core softening performance is similar to mid-range units.
Brand reputation and warranty support deserve serious consideration because you’re buying a piece of equipment that will travel thousands of miles and experience conditions that challenge its reliability. Established water treatment manufacturers like Watts, On The Go, and ABC Waters have proven track records of producing durable portable softeners and providing responsive customer support when issues arise. Read multiple reviews from actual RV or marine users rather than relying solely on manufacturer claims or single testimonials, paying particular attention to comments about reliability, customer service quality, and how well the product performs after months or years of use. A 5-year warranty offers significantly more protection than a 1-year warranty and suggests the manufacturer has confidence in their product’s durability.
Dealer vs. direct purchase options both have merit depending on your situation and preferences. Local RV dealers and marine supply stores allow you to see the physical product, ask questions of knowledgeable staff, and potentially get installation guidance or service support. The trade-off is typically higher prices compared to online purchasing, sometimes 20-30% more for the same unit. Online retailers offer lower prices and wider selection but require more self-reliance for installation and troubleshooting. Consider whether you value the peace of mind and local support of a dealer purchase over the cost savings of buying online—there’s no universally correct answer, as it depends on your comfort level with DIY installation and your budget constraints.
For those researching comprehensive portable solutions for mobile living, you can explore various water treatment options and find quality portable water softener systems designed specifically for RV, marine, and temporary installations that deliver consistent performance across different water conditions.
Integration with Existing RV Water Systems
Successfully integrating a portable water softener into your RV’s water system requires understanding how RV plumbing works and where the softener fits most effectively. Most RVs have two distinct water systems—a pressurized city water connection for campground hookups and an onboard fresh water tank with pump for dry camping. Your portable water softener can be configured to treat either or both systems depending on your installation approach and preferences, with each configuration offering specific advantages and trade-offs.
Inline city water installation is the most common approach, connecting the softener between the campground water spigot and your RV’s city water inlet. This configuration is simple, requires no permanent modifications to your RV, and treats all water entering through city water hookups. The softener sits outside your RV, typically on the ground near the water connection or mounted under the RV if you’ve installed permanent brackets, and processes water before it reaches any RV fixtures or appliances. The disadvantage is that your fresh water tank remains hard if you fill it for dry camping, and the softener doesn’t treat tank water when you’re boondocking without hookups.
Fresh water tank treatment involves running your softener while filling the tank, either by connecting it inline during the fill process or by recirculating tank water through the softener. This approach softens the water you’ll use during dry camping but requires more planning and setup time since you must connect the softener specifically for tank filling.
Some users prefer this method because it allows them to store the softener inside the RV during travel and set it up only when needed, saving external storage space and protecting the unit from road grime. The challenge is that it doesn’t treat city water when you’re at campgrounds with hookups unless you set up the softener twice—once for tank filling and again for city water connection.
Permanent integration represents the most sophisticated approach, installing the portable water softener inside an RV storage compartment with hard-plumbed connections to both the city water line and fresh water tank system. This configuration requires cutting into existing plumbing and installing appropriate valves to direct water through the softener or bypass it as needed, essentially treating the “portable” softener as a permanent RV component. While this eliminates setup hassle and provides soft water for both city hookups and tank usage, it requires significant plumbing skill, consumes valuable storage space, and may complicate winterization. Most users find this level of integration unnecessary for portable softeners, preferring the flexibility of simpler external installations.
Pressure tank considerations affect how portable water softeners interact with your RV’s water pump and fresh water system. When operating on tank water, your pump cycles on and off to maintain system pressure, and these rapid pressure fluctuations can affect softener performance and accelerate wear on connections and seals. Installing a pressure accumulator tank (a small bladder-style pressure tank) in your RV’s plumbing system smooths these pressure pulses, extending the life of your softener and providing more consistent water flow. This is especially important if you’ve permanently integrated your softener and regularly use it with tank water, though it’s less critical for simple city water installations where campground pressure is relatively stable.
Frequently Asked Questions About Portable Water Softeners
How often do I need to regenerate my portable water softener?
Regeneration frequency depends on three factors: your softener’s grain capacity, your water hardness level, and your daily water consumption. A 10,000-grain portable water softener treating 30 gallons per day of 10-grain hardness water would need regeneration approximately every 33 days (10,000 ÷ 300 daily grains = 33.3 days). However, most manufacturers recommend regenerating before complete exhaustion, so plan for every 25-30 days in this example. Test your water hardness at each new location and adjust your regeneration schedule accordingly, as harder water exhausts capacity faster.
Can I drink water from a portable water softener?
Yes, water from a portable water softener is safe to drink, though the softening process adds sodium that some people prefer to avoid. The amount of sodium added is proportional to the water’s original hardness—harder water results in more sodium because more calcium and magnesium are replaced. People on sodium-restricted diets can use potassium chloride instead of salt for regeneration, or install the softener to treat only hot water while leaving cold drinking water untreated. The ion exchange process itself doesn’t introduce contaminants, though you should ensure your softener’s resin is food-grade approved if drinking water is a concern.
Suggested read: Used Portable Restrooms for Sale: What to Know Before You Buy
What’s the difference between portable and residential water softeners?
Portable water softeners are smaller, lighter, and designed for manual operation and frequent movement, while residential systems are larger, permanently installed, and typically feature automatic regeneration timers. Capacity differs significantly—portable units range from 8,000-16,000 grains compared to residential systems that may offer 30,000-80,000 grains or more. Flow rates are also lower in portable models (3-10 GPM vs. 12-20+ GPM for residential), which is adequate for RV and marine applications where you use one fixture at a time but would cause pressure problems in houses where multiple fixtures run simultaneously. The core ion exchange technology is identical in both types.
Do portable water softeners remove bacteria or viruses?
No, portable water softeners do not remove bacteria, viruses, or other biological contaminants. The ion exchange process specifically targets dissolved minerals like calcium and magnesium and has no effect on microorganisms. If you’re connecting to water sources where biological contamination is a concern, you must use appropriate disinfection methods (chlorine, UV light, filtration) before or after softening. Many RV users combine their portable water softener with a sediment/carbon filter that removes particles and improves taste, but this combination still doesn’t provide biological protection—consider a dedicated water purification system if using questionable water sources.
Can I use my portable water softener in freezing temperatures?
No, portable water softeners must be protected from freezing to prevent damage. Water expands when frozen and will crack tanks, damage seals, and destroy valve components if allowed to freeze inside the softener. If you camp in below-freezing conditions, either bring your softener indoors when temperatures drop, or properly winterize it by draining all water and adding RV antifreeze to protect any remaining water in valves and passages. Most users in cold climates simply disconnect and store their softeners indoors during winter months, then reinstall them when spring arrives and temperatures consistently stay above freezing.
How long does the resin last in a portable water softener?
Quality water softener resin typically lasts 10-15 years under normal operating conditions, and may last even longer in portable applications where usage is intermittent rather than continuous. Resin life is shortened by chlorine exposure, iron fouling, physical damage from pressure surges, and operation outside recommended temperature ranges (usually 40-120°F). You can extend resin life by pre-filtering water to remove sediment and iron, using a carbon filter to remove chlorine, performing periodic resin cleaning, and operating the system within manufacturer specifications. When resin finally does fail, it becomes brittle and breaks into fragments that can be seen in your water, or loses capacity to the point where regeneration no longer restores softening ability.
Is a portable water softener worth the investment for occasional RV use?
The value proposition depends on your water hardness, the sensitivity of your RV’s plumbing components, and how much the quality-of-life improvements matter to you. If you camp primarily in areas with moderate to very hard water (above 10 grains per gallon), use your RV for extended trips totaling several weeks or months annually, and value comfortable showers and easy cleaning, a portable water softener typically pays for itself within 2-3 years through protection of your RV’s water heater and fixtures. Even occasional users benefit from not having to scrub mineral deposits from their RV’s bathroom and kitchen, and the improved bathing experience alone justifies the investment for many people regardless of appliance protection considerations.
Can I install a portable water softener myself without plumbing experience?
Yes, most portable water softeners are designed for DIY installation and require no special plumbing skills. The typical setup involves connecting standard garden hoses from the water source to the softener inlet and from the softener outlet to your RV or boat connection—essentially just screwing hoses onto threaded ports. The only tools needed are an adjustable wrench or pliers to tighten connections and prevent leaks. Following the manufacturer’s instructions for initial regeneration is straightforward, though it does require attention to detail and patience for the process to complete. If you can connect a garden hose to a spigot, you can install a portable water softener.
What maintenance does a portable water softener require?
Regular maintenance involves monitoring salt levels and adding more before each regeneration, performing the regeneration process according to your usage schedule, and cleaning the resin bed every 6-12 months with a specialized cleaner. You should also inspect hoses and connections periodically for signs of wear or leaks, test your water hardness occasionally to verify the system is working properly, and properly winterize the softener if storing it in freezing conditions. These tasks require no special skills and take only a few minutes per month in most cases. The most time-consuming maintenance is the regeneration process itself, which takes 60-120 minutes but requires minimal hands-on time since the system largely runs itself once initiated.
Will a portable water softener work with my specific RV model?
Portable water softeners work with virtually all RV models because they connect to standard water hookup points rather than requiring integration into specific RV plumbing configurations. Your RV’s city water inlet accepts a standard 3/4-inch garden hose connection, and portable softeners output through a matching connection, making them universally compatible. The only considerations are whether you have adequate space to store or mount the softener (most units are 10-20 inches tall and 6-10 inches in diameter), and whether your RV’s water system can accommodate the softener’s flow rate, which is rarely an issue since portable softeners provide 4-10 GPM, adequate for typical RV usage.
Taking Action: Getting Started with Your Portable Water Softener
Making the transition to softened water in your RV, boat, or mobile living situation requires taking several concrete steps to ensure success. Start by testing your water hardness at your most frequent camping locations or at home to understand the challenge you’re addressing. Simple water hardness test kits are available at hardware stores for $10-15 and provide accurate measurements in minutes, giving you the data needed to properly size your softener and calculate regeneration schedules. Document hardness levels at different locations in a notebook or smartphone app, creating a reference guide that will prove valuable for years of travel.
Research and compare several portable water softener models within your budget range, reading reviews from actual RV or marine users who have similar needs and usage patterns. Look specifically for feedback about durability, ease of regeneration, customer service quality, and whether the unit’s capacity matches manufacturer claims. Online RV forums and boating communities offer excellent real-world experiences from people who’ve used these products extensively, often providing more honest assessments than professional reviews or manufacturer marketing materials.
Once you’ve selected and purchased your portable water softener, dedicate time to properly set it up following the manufacturer’s initial preparation instructions. Don’t skip the initial regeneration even though it seems unnecessary for a new unit—this critical step ensures the resin is properly charged and ready for efficient operation. During your first few uses, pay close attention to how the system performs, how quickly capacity exhausts based on your usage, and whether you encounter any installation or operational challenges while you’re still learning the system. Making adjustments early is much easier than dealing with problems after months of improper operation.
Document your processes by creating a simple checklist for regeneration procedures, noting water hardness levels at different locations, and tracking when you perform maintenance tasks. This documentation might seem unnecessary initially, but becomes invaluable when you’re trying to troubleshoot problems, decide when to regenerate, or explain the system to a spouse or travel companion who needs to operate it. Many experienced RV users keep a small laminated card with regeneration steps attached to their softener, ensuring they never miss a critical step even if months pass between regenerations.
The investment in a portable water softener represents more than just purchasing equipment—it’s a commitment to improving your mobile living experience through better water quality. Whether you’re protecting expensive RV appliances, ensuring comfortable bathing conditions for your family, or simply tired of fighting hard water stains and mineral buildup, these compact systems deliver measurable benefits that enhance every aspect of life on the road or water. By selecting the right system for your needs, installing it properly, and maintaining it diligently, you’ll enjoy years of soft water wherever your adventures take you.
For comprehensive information and to explore high-quality portable water softener options specifically designed for mobile applications, visit specialized retailers who understand the unique requirements of RV and marine water treatment systems.
Ready to eliminate hard water problems from your mobile lifestyle? Invest in a quality portable water softener today and experience the difference soft water makes in every shower, every load of laundry, and every dish you wash. Your RV’s plumbing system will thank you, your skin will feel better, and you’ll wonder how you ever traveled without one.